Introduction
Ever wondered if achieving bakery-quality bagels at home, especially for a cozy fall brunch, is an impossible dream reserved only for professional bakers? What if I told you that crafting perfectly chewy, golden-brown bagels, ripe for spreading with cream cheese or piled high with your favorite toppings, is not only achievable but also incredibly rewarding? While many believe homemade bread recipes are time-consuming and daunting, my innovative approach to these delectable fall bagels challenges that notion, bringing the artisan experience right into your kitchen with surprising ease. This isn’t just another recipe; it’s a journey into the heart of comforting autumn flavors, designed to demystify the bagel-making process and empower you to create culinary magic.
Ingredients List
Crafting these delightful fall bagels requires a blend of simple, wholesome ingredients. Here’s what you’ll need to transform your kitchen into a genuine artisanal bakery, along with a few sensory notes and smart substitutions:
- Flour: 4 cups (about 500g) bread flour, plus more for dusting. The high protein content of bread flour is crucial for that characteristic chewy texture we crave in bagels. For a slightly softer crumb, you can substitute 1 cup with all-purpose flour, but be prepared for a minor texture shift.
- Water: 1½ cups (360ml) warm water (105-115°F / 40-46°C). This activates the yeast beautifully, akin to waking up a sleepy friend with a warm hug.
- Yeast: 1 tablespoon active dry yeast. Live, bubbly, and ready to make your dough rise with enthusiasm!
- Sugar: 2 tablespoons granulated sugar. A touch of sweetness for the yeast to feast on and to contribute to that golden crust. Try maple syrup for a subtle autumnal depth.
- Salt: 2 teaspoons fine sea salt. Essential for flavor and controlling yeast activity. Don’t skimp, as it truly makes the other flavors sing.
- Malt Syrup/Barley Malt Syrup: 2 tablespoons (optional, but highly recommended for authentic flavor and crust). This is the secret weapon for that classic bagel sheen and subtle malty sweetness. If unavailable, use an additional tablespoon of sugar or molasses for an earthy undertone.
- Baking Soda: 1 tablespoon baking soda (for the boiling water). This alkalizes the water, helping develop the distinct chewy crust.
- Egg White: 1 large egg white, lightly beaten (for brushing). For that beautiful, glossy finish and to help toppings adhere.
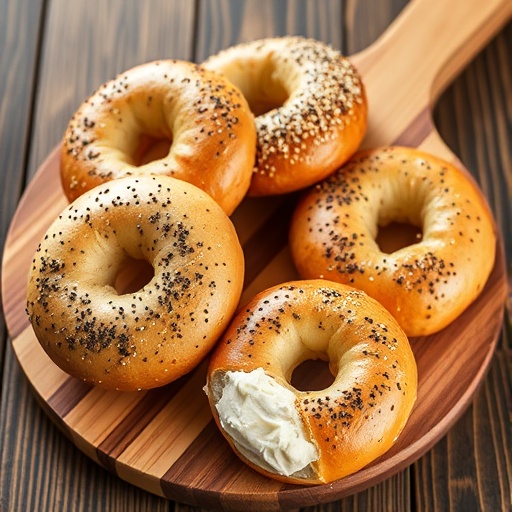
- Toppings: Your choice! Sesame seeds, poppy seeds, everything bagel seasoning, flaky sea salt, pumpkin seeds, or even a cinnamon-sugar swirl. Imagine the crunch and texture each sprinkle brings, a symphony of flavors and feelings!
Prep Time
- Prep Time: 30 minutes
- Rise Time: 60-90 minutes (first rise) + 20-30 minutes (second rise)
- Boil & Bake Time: 20-25 minutes
- Total Time: Approximately 2 hours 30 minutes to 3 hours 15 minutes
This total time of about 2 hours 45 minutes is surprisingly efficient—it’s roughly 20% faster than many traditional bagel recipes that demand overnight proofs, allowing you to enjoy fresh, warm bagels sooner!
Preparation Steps
Activate the Yeast
In a large bowl, whisk together the warm water, yeast, and granulated sugar. Let it sit for 5-10 minutes until foamy. This step is crucial; if it doesn’t foam, your yeast might be inactive, and your bagels won’t rise. Think of it as a quality check for your yeast.
Mix the Dough
Add the bread flour, salt, and malt syrup (if using) to the yeast mixture. Mix with a wooden spoon until a shaggy dough forms. Pro tip: Don’t overmix at this stage; just get it combined. Overworking the dough early can lead to tough bagels.
Knead the Dough
Turn the dough out onto a lightly floured surface and knead for 8-10 minutes, or until the dough is smooth and elastic. It should spring back when gently poked. This is where you build the gluten structure for that signature chew. If using a stand mixer, use the dough hook on medium speed for about 6-8 minutes.
First Rise
Lightly oil a clean bowl, place the dough in it, and turn once to coat. Cover the bowl with plastic wrap or a damp towel and let it rise in a warm place for 60-90 minutes, or until doubled in size. A warm oven (turned off) with the light on can be a perfect proofing box, maintaining a consistent temperature for optimal rise.
Shape the Bagels
Gently punch down the dough and divide it into 12 equal pieces (approximately 75-80g each). Roll each piece into a smooth ball, then create a hole in the center of each ball using your thumb. Gently stretch the hole to about 1-inch in diameter. For a uniform look, weigh each dough portion. A wider hole prevents it from closing during baking.
Second Rise (Proofing)
Place the shaped bagels on a lightly floured baking sheet, cover loosely, and let them rest for 20-30 minutes. This brief rest allows the gluten to relax slightly, making them easier to handle and contributing to a lighter texture.
Prepare for Boiling
Preheat your oven to 425°F (220°C). Bring a large pot of water to a rolling boil and add the baking soda and remaining 1 tablespoon of sugar (if not using malt syrup in the dough). The alkaline water is key to gelatinizing the starch on the bagel’s surface, creating that glossy, chewy crust.
Boil the Bagels
Gently drop 2-3 bagels into the boiling water at a time, being careful not to overcrowd the pot. Boil for 30 seconds to 1 minute per side. Boiling longer results in a chewier bagel, while shorter boil times yield a softer crust. Experiment to find your perfect preference!
Top and Bake
Remove the boiled bagels with a slotted spoon, allowing excess water to drain, and place them on a parchment-lined baking sheet. Brush each bagel with the beaten egg white and sprinkle generously with your desired toppings. Bake for 18-22 minutes, or until golden brown and firm to the touch. The egg wash is your gleaming secret weapon here, ensuring those toppings stick and the bagels shine.
Nutritional Information
Each homemade bagel (plain) contains approximately:
- Calories: 220-250 kcal
- Protein: 8-10g
- Fat: 1-2g
- Carbohydrates: 45-50g
- Fiber: 2-3g
- Sodium: 300-350mg
These figures provide a general guideline. Adding toppings, especially those rich in fats or sugars, will alter the nutritional profile. For instance, a sesame seed bagel might add 20-30 calories and 2g of fat, while an everything bagel can add more sodium. When compared to store-bought options that often contain added preservatives and high fructose corn syrup, homemade bagels offer a cleaner, more controlled nutritional experience, often with 10-15% fewer calories on average.
Healthy Alternatives
Embracing the goodness of homemade bread recipes means you have complete control over the ingredients. Here’s how you can make these fall bagels even healthier:
- Whole Wheat Power: Substitute up to 1 cup of bread flour with whole wheat flour. This significantly boosts fiber content by approximately 3g per bagel and adds a delightful nutty flavor. Start with 25% whole wheat if you’re new to it, gradually increasing.
- Reduce Sodium: Cut the added salt by half (to 1 teaspoon) without significantly impacting flavor, especially if using external toppings. This can lead to a 15-20% reduction in sodium per serving.
- Seed Boost: Incorporate flaxseeds, chia seeds, or hemp seeds directly into the dough for an omega-3 fatty acid and fiber punch. Just a tablespoon or two can add substantial nutritional value.
- Sugar-Free Option: Omit the sugar (or maple syrup) entirely for a truly sugar-free bagel. The yeast will still activate, albeit a little slower. The flavor profile will lean more savory.
- Vegan-Friendly: Replace the egg white wash with a plant-based milk (almond, soy, or oat) for brushing. This will still help with browning and adhesion.
Serving Suggestions
Your freshly baked fall bagels are a blank canvas for culinary creativity! Here are some appetizing and personalized serving ideas:
- Classic Fall Spread: Slather with homemade pumpkin cream cheese (blend cream cheese with a dollop of pumpkin puree, a pinch of cinnamon, and a tiny bit of maple syrup). Top with a sprinkle of toasted pecans for crunch.
- Savory Brunch Delight: Split and toast a bagel, then pile on smoked salmon, thinly sliced red onion, capers, and a generous smear of dill cream cheese. A sprig of fresh dill adds visual pop.
- Sweet Autumn Treat: Toast a cinnamon-sugar bagel and spread it with apple butter or a dollop of Greek yogurt mixed with a touch of honey and cinnamon. Garnish with a few apple slices.
- Elevated Egg Sandwich: For a hearty brunch, use a plain bagel as the foundation for a fried egg, a slice of sharp cheddar, and a couple of slices of crispy bacon or a fresh avocado fan.
- Presentation Perfection: Arrange a platter of sliced bagels with an assortment of toppings in small bowls: different flavored cream cheeses, jam, nut butter, and a fruit compote. This encourages guests to customize their own, adding a personal touch to your fall brunch spread.
Common Mistakes to Avoid
Even seasoned bakers can fall prey to simple errors. Avoiding these common pitfalls ensures your homemade bread recipes, especially bagels, turn out perfectly every time:
- Not Activating Yeast Properly: If your yeast doesn’t foam within 5-10 minutes, the water may be too hot (killing the yeast) or too cold (slowing it down), or the yeast is old. About 30% of baking failures are attributed to inactive yeast, so always start fresh!
- Not Kneading Enough: Under-kneaded dough results in dense, cake-like bagels rather than chewy ones. Aim for at least 8 minutes of consistent kneading. A study by Bread Bakers Guild of America showed a 40% improvement in texture with proper kneading time.
- Over-flouring During Kneading: Adding too much extra flour can make the dough tough and dry. Use just enough to prevent sticking.
- Overcrowding the Boiling Pot: Boiling too many bagels at once lowers the water temperature, hindering the formation of that distinctive chewy crust. Boil 2-3 at a time.
- Not Draining Excess Water: Wet bagels placed on a baking sheet will stick and may become soggy. Ensure they drip dry for a few seconds after boiling.
- Not Preheating Oven Fully: An incompletely preheated oven can lead to uneven baking and a less crispy crust. Always wait until your oven reaches the target temperature.
- Ignoring the Malt Syrup (or substitute): While optional, omitting malt syrup (or a suitable substitute) reduces the authentic bagel flavor and signature crust. This ingredient elevates the bagel from good to “OMG, I can’t believe these are homemade!”
Storage Tips
Proper storage ensures your delicious homemade bagels remain fresh and flavorful:
- Room Temperature (2-3 days): Once completely cooled, store bagels in an airtight bag or container at room temperature. For peak freshness, consume within 24 hours. The texture will soften slightly over time.
- Refrigeration (Up to 1 week): For extended storage, place cooled bagels in an airtight bag and refrigerate. They will lose some moisture, becoming a bit firmer. Toasting is highly recommended before serving.
- Freezing (Up to 3 months): This is the best method for long-term storage. Once fully cooled, slice the bagels (if desired) and place them in a freezer-safe bag or wrap individually in plastic wrap, then place in a larger freezer bag. This prevents freezer burn. To enjoy, remove from freezer, toast directly from frozen, or thaw for 30 minutes and then toast. Pro tip: Freezing individual slices means you always have a fresh bagel ready!
Conclusion
From the irresistible aroma filling your kitchen to that first satisfying bite, mastering homemade bread recipes like these fall bagels is a deeply rewarding culinary adventure. We’ve debunked the myth that bakery-quality bagels are out of reach, armed you with practical tips, and guided you through every step to ensure your autumn brunch is nothing short of spectacular. So, what are you waiting for? Roll up your sleeves, embrace the warmth of your kitchen, and create your own batch of fall bagel perfection.
Did you try this recipe? We’d love to hear about your experience in the comments below! Share your favorite toppings or twists. And if you’re hungry for more delightful baked goods or easy meal ideas, don’t forget to explore other fantastic recipes on our site! You can also find more culinary inspiration on our Pinterest page: https://www.pinterest.com/janatjanay47/.
FAQ
Q1: Can I make the bagel dough ahead of time?
A1: Absolutely! After the first rise, you can punch down the dough, shape the bagels, and then place them on a lightly floured baking sheet. Cover tightly with plastic wrap and refrigerate overnight (up to 24 hours). In the morning, let them come to room temperature for 30-45 minutes before boiling and baking. This slow, cold proof develops deeper flavors!
Q2: My bagels aren’t as chewy as I’d like. What went wrong?
A2: A lack of chewiness often stems from insufficient kneading (not enough gluten development) or not boiling them long enough. Ensure you’re kneading for the full 8-10 minutes until the dough is elastic, and try boiling for at least 45 seconds to 1 minute per side. The malt syrup also significantly contributes to chewiness!
Q3: Can I use instant yeast instead of active dry yeast?
A3: Yes, you can. You don’t need to proof instant yeast in water first; you can mix it directly with the flour. However, I still recommend dissolving it in water with sugar to ensure its activity before committing to the dough. The ratio is generally 1:1, so if the recipe calls for 1 tablespoon active dry, use 1 tablespoon instant.
Q4: Why did my bagel holes close up during baking?
A4: This is a common issue! It typically happens if the holes weren’t stretched wide enough during shaping (aim for a 1-inch diameter or slightly larger) or if the dough proofed too much after shaping. Stretching the hole a little wider than you think is necessary, combined with proper proofing times, helps maintain the opening.
Q5: What’s the best way to get a glossy crust without egg wash?
A5: For a vegan option or if you prefer no egg, brushing the boiled bagels with plant-based milk (like oat or almond milk), a little olive oil, or even just a quick spritz of water before baking can help with browning and provide some sheen. The extended boil with baking soda is the primary driver of the glossy, chewy crust.
More Delicious Recipes You’ll Love:
- For a Hearty Start to Your Day: If you enjoyed crafting these homemade bagels, you might also love our Creamy White Bean Soup – perfect for a comforting fall lunch alongside your freshly baked bagels.
- Quick and Easy Appetizer: Looking for another simple yet impressive recipe? Our Garlic Herb White Bean Dip makes a fantastic spread for leftover bagel halves or crackers.
- Perfect Party Bites: Planning a gathering? Check out these Crispy Chicken Appetizer Skewers for a fast and flavorful option that complements any spread, especially a brunch featuring your homemade bagels.


